Recording Gameplay Footage in OBS Studio
We’ve all been there, those mind-blowing, pulse-pounding gaming moments that leave you wishing you could relive them forever.
Maybe it was that epic boss battle where you barely survived by the skin of your teeth or that clutch play that won the match and had your friends screaming like banshees.
Whatever the case, preserving those memories is a gamer’s dream. Enters OBS Studio 30.0.2, the open-source recording and broadcasting powerhouse that lets you capture your gaming glory like a pro.
Whether you’re a seasoned streamer with a legion of fans, a budding content creator trying to make your mark, or someone who loves to savor their gaming sessions like a fine wine, OBS Studio is about to become your new best friend.
In this guide, we’ll walk you through the ins and outs of capturing your gaming escapades, from setting up the perfect scene to troubleshooting like a boss. So grab your controller, crack those knuckles, and get ready to immortalize your virtual exploits.
1. Install OBS Studio
Before recording, you must download and install OBS Studio from the website (https://obsstudio.net/download). Don’t worry; it’s free, and we won’t try to sell you a timeshare in the Mushroom Kingdom. Once you’ve got it up and running, it’s time to set the stage for your gaming masterpiece.
Creating Scenes & Sources
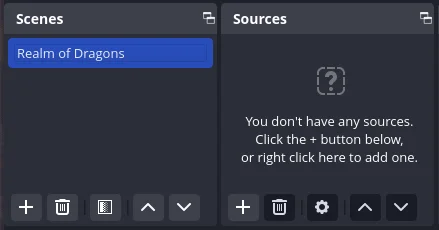
In OBS Studio, scenes are like different acts in a play, and sources are the props that bring them to life. To create a new scene, click the “+” button under “Scenes” (bottom left corner).
Give it a name that fits your game – something epic like “Realm of Dragons” or “Galactic Odyssey” would work perfectly. You could even call it “Pixelated Pandemonium” if you feel particularly whimsical.
We also have an article on Understanding Sources in OBS Studio
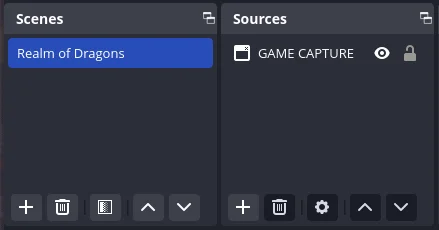
Next, add a source by clicking the “+” under “Sources.” Choose “Game Capture” to let OBS work magic on your game window. It’s like giving your game a front-row seat on the digital stage.
You’ll have two capture options:
- Fullscreen: This captures any fullscreen game without fuss. Perfect for those immersive experiences where you want to lose yourself in the virtual world.
- Capture specific window: Use this to handpick your game window from the digital crowd. Make sure your game runs before you select it, or you might capture your desktop background instead of that heart-pounding action.
One game capture source per scene is the way to go. If you’re a shape-shifting wizard who plays multiple games (we won’t judge), set up hotkeys to switch between them seamlessly. That way, you can go from slaying dragons to piloting spaceships without missing a beat.
Audio & Video Settings
What’s an epic gaming moment without the roar of combat or the pulse-pounding soundtrack? It’s like watching a blockbuster movie on mute – sure, you can still enjoy the visuals, but you’re missing out on that immersive experience. Let’s get your audio set up:
Click “Settings” (lower-right corner).
Navigate to the “Output” tab.
Under “Recording,” choose your destination folder for saved recordings. Maybe create a folder called “Gaming Greatness” or “Pixel Perfection” to keep things organized.
Select a compatible video format (MP4, FLV, or whatever floats your boat). Just ensure it’s something your video editing software can handle, or you might end up with many useless files.
I would suggest using an ‘H.264’ or ‘x264’ encoder to protect your recordings from sudden power loss or crash.
Enable “Separate file per scene” (because even pixels deserve their spotlight). You don’t want your dragon-slaying footage mixed with your space adventures, do you?
Now, navigate to the “Audio” tab and select your preferred options.
Action!
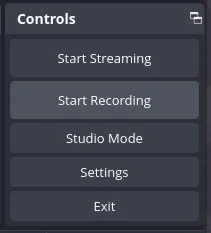
With your scene set and audio sorted, it’s time for the main event. Hit that sweet “Start Recording” button, and watch as your game leaps onto the canvas, ready for its close-up. Keep an eye on the preview window – your backstage pass to the digital theater, where you can ensure everything looks perfect before the curtain rises.
Now, it’s showtime! Slay those dragons, conquer those galaxies, and let your gaming prowess shine. Don’t be afraid to get a little dramatic – after all, you’re recording for posterity. Celebrate those victories with a fist pump, and let those epic one-liners fly. Don’t let your mom catch you cursing like a sailor when things don’t go your way.
Troubleshooting Like a Boss
Sometimes, even the most seasoned gamers run into hiccups. Maybe your game capture starts acting up, or your audio sounds like it’s coming through a tin can. Don’t panic – OBS Studio has handy guides (https://www.obsstudio.net/guide/) that’ll help you banish those gremlins and appease the pixel gods.
And remember, if all else fails, you can always consult the OBS Studio forums or reach out to the friendly community on Discord. They’re a bunch of tech-savvy gamers who’ve seen it all, and they’ll be more than happy to help you slay those digital demons.
Conclusion:
And there you have it, fellow gamers! With OBS Studio in your arsenal, you’re now a digital bard, weaving tales of epic victories and hilarious defeats. So go forth, record your adventures, and may your frame rates be high and your lag be nonexistent.
Remember, in the grand theater of gaming, you’re the star. Break a virtual leg, and don’t forget to strike a pose when you land that final blow – it’ll make for a killer thumbnail.
Related Guides
Quick Start Guide
Top 10 OBS Studio Tips and Tricks
